Part 3: Options for data migration
In the last part we looked at what steps are involved to rebuild the functionality and data model inside a new solution with the “greenfield” approach. In this part, we want to look at the difficulties and options that we have, to transport data rows from one to another Dynamics 365 CE / Dataverse instance and evaluate which option is best suited for the “greenfield” approach.
First, let us look what options we see in the wild:
- Use of the Excel/CSV Export and Import feature
- Use the Configuration Migration Tool from the Developer Tools / SDK
- Use an ETL Tool like SSIS, Azure Data Factory or Power Platform dataflows
- Use a self-written (C#) Console Application
Difficulties in Data Migration
Before we decide which option is best suited for our use case, let us look what difficulties we must handle to migrate data between to Dynamics/Dataverse instances.
Handling Referential integrity
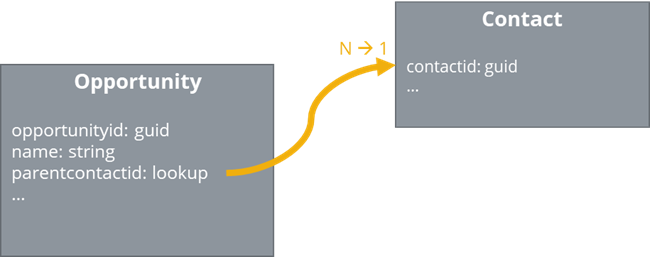
While importing data rows of an entity, we must consider referential integrity
. Dataverse enforces it for every create or update operation. For example, when importing an opportunity that has set the filed “parentcontactid” to a contact, we must ensure that the referenced contact dataset already exists in the destination the system before creating the opportunity. To solve this problem, the simplest approach is that we first migrate all contacts and in second step all opportunities.
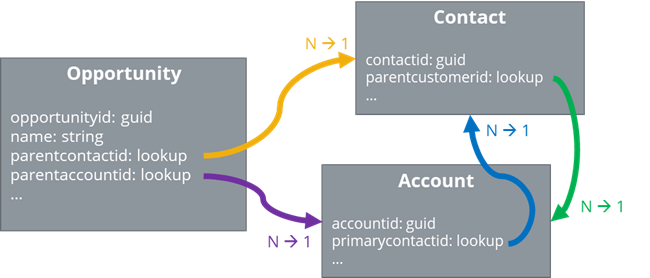
That approach works well as long, as you can resolve all dependencies to a tree (graph theory) with one single root node. Unfortunately, this is an unrealistic case. I my experience, the least minimum set of entities to migrate, are typically contacts and accounts. And if you look at the relationships between the contact and the account entity, you can see, that it contains at least one cyclic reference that makes it impossible to build up a tree.
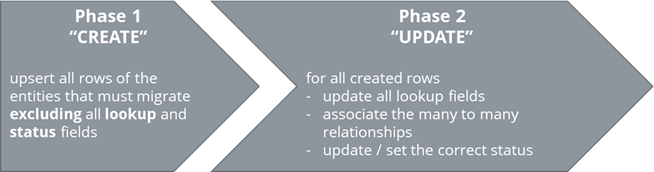
To overcome this problem, we use the following pattern. We split the creation of the rows into two phases. In the first phase we CREATE all rows of all entities we want to migrate, excluding all lookup and status fields. At the second phase we UPDATE all created rows, herewith set all lookup fields, associate the many to many relationships and set the correct status. Splitting the creation in a create and update phase, brings the advantage, that you don’t have to think about the correct order to migrate and moreover makes it possible to migrate entities with circular references.
Side Note: For each row that we create on the new Dataverse instance, we always use the GUID of the source system as the ID of the row in the destination system. We don’t let the Dataverse instance generate a new GUID. Technically we use the “Upsert” functionality instead of an “Create” for Phase 1. With this pattern we can simply set lookup fields in phase 2 with their original GUID of the source system.
Handling status and status reason fields
Dataverse defines a status and status reason field for all entities. Each entity has at least two status values “active” or “inactive”. If a row is in the status “inactive” it is read only and can’t be modified anymore. Dataverse does not allow us to directly create a row in the status “inactive”. That’s becomes a problem when migration rows where the status is “inactive”. To solve this, we use the same pattern as above and split the creation of the row in two phases. In the first phase, we don’t set any of the status fields. In the second phase, we set the status and status reason fields.
For some entities it’s not possible to set the state by simply updating the status and status reason fields. As example the opportunity defines the special actions “win opportunity” and “close opportunity” that must be called to change the state. The solution here is to call these special actions in Phase 2.
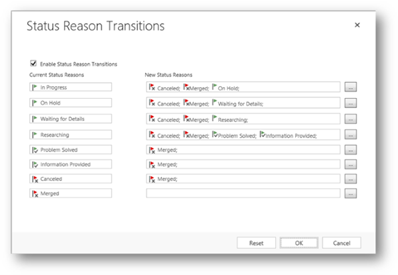
Source: Define status reason transitions with Power Apps – Power Apps | Microsoft Docs
Dataverse also allows, to define status reason transitions
. With that configured, it’s not possible to simply set the desired status and status reason. As show in the example below, all cases must pass through the at least one stage (In Progress > On Hold > Waiting for Details > Researching) before it can be marked as “resolved”. For the data migration, we also must consider this in Phase 2.
Handling different schema of source and destination entities
- Field Name
abc_name –> xyz_nameabc_email –> xyz_email
- Data Type
- Text –> Multi Line (easy)
- Text –> Option Set (parsing required)
- Option Set –> Lookup (extra logic required)
- Lookup –> Option Set (extra logic required)
- Option Set Values
- Green
5690001 –> Green 1230001
- Red
5690002 –> Red 1230002
- Yellow
1 –> Yellow 1230003
- Entity Names
- Merging or Splitting Fields
- Merge of abc_name and
abc_name2 –> xyz_name
- Splitt of
abc_phonenumber –> xyz_phonenumber1_location and xyz_phonenumber1
As shown in the examples above, there are many schema changes, partly driven by changed business requirements, that need complex transformation logic.
Handling large data sets
Be prepared to migrated large datasets with thousands or even million rows. Be prepared for notes and e-mails with heavy attachments. The largest data set we migrated with our own tooling around 2 million contacts. With that in mind, tooling should be prepared to handle this large amount of data, timeouts and retries. Paging to extract the entities from the source environment and batching to load them in the destination environments as well as parallel writes and multiple threads help keeping the migration speed as fast as possible. To transport the large attachments as fast as possible, we usually use a virtual machine in azure, here you get the best latency to the destination environment.
Error Handling and Logging
How to prove that all data has been successfully migrated? And what if there were some errors? One quantitatively option is to count the rows of the source system and destination system after the migration and subtract the amounts. If the result is equal zero, you have migrated all rows. But that does not indicate what errors happened and can’t tell if every row is updated correctly in the second phase. To have a qualitative statement, logging all errors and logging all successful migrated rows in a form that is analyzable like an CSV output is preferable. Using such an output as an input file for a new migration run that only handles the failed row is even more preferable. Part 6 of this series will go deeper how we implemented error handling and logging in our tooling.
Mapping system users
Lookup fields to system user rows can’t be handled like normal lookup fields. That’s because we can’t use the original GUID of the source system to reference a user in the destination system user. System users in Dataverse are created automatically in interaction with the Azure Active Directory and therefor have different IDs. To overcome this problem, we have to build up a Mapping Table to translate a GUID of a system user in the old environment to the new Dataverse instance. This can be done by mapping the GUIDs over the e-mail address.
E.g., for the user with E-mail “abcxyz@objektkultur.de” on the old system has the GUID 00000000-0000-0000-0000-000000000001 and on the new system 9f67b42c-91b1-44e8-b42b-f58ed920bdc4. Updating a row and setting the owner filed to the old GUID would case an error. Therefor you have to implement a logic that uses the new GUID 9f67b42c-91b1-44e8-b42b-f58ed920bdc4 instead.
On every entity in Dataverse we find the fields “created on”, “created by”, “modified on” and “modified by”. They are set automatically by the platform and to track meta information. While migrating data, this can become a pitfall if you don’t handle it correctly. After the migration, every data row is “created on” and “modified on” the migration day, plus “created by” and “updated by” the system user you are doing the data import. That’s at least unaesthetic and often bothers the end users. For the filed “created on” Dataverse provides the possibility to set it via the field overriddencreatedon, but how to set the other fields? Part 5 of the series will go into detail how we resolved this issue.
Options
After we seen the difficulties that we are faced with, let us go through our options and check if they can handle them.
Table 1 – An opinionated comparison of the options to migrate data [+ good, / neutral, - bad]
|
#1 CSV Export & Import |
#2 Config. Migration Tool |
#3 ETL Tool |
#4 Console Application |
| Referential integrity |
/ |
/ |
+ |
+ |
| Status and status reason fields |
/ |
/ |
+ |
+ |
| Different schemas |
- |
- |
+ |
+ |
| Large data sets |
- |
/ |
+ |
+ |
| Error Handling and Logging |
- |
- |
/ |
+ |
| Mapping System Users |
/ |
/ |
+ |
+ |
| Reproducible |
- |
+ |
+ |
+ |
| Ability to debug |
- |
- |
/ |
+ |
| Development Effort |
+ |
/ |
- |
- |
| Recommend for the “greenfield” approach |
No |
No |
Yes |
Yes |
#1 Excel/CSV
“Simply Export the rows to CSV and reimport it on the new System”, that’s mostly the first idea how to migrate data between an On-premises Dynamics CE system and an Online Dataverse instance. And It’s a valid choice, until you only have to migrate a hand full of tables, that only has a limited amount of data, and you don’t have to deal with relationships between the tables. It even supports simple schema transformations. E.g., while importing it’s possible to define the mapping of a text row formally named “abc_name” to “xyz_name” to the destination system. It’s starts getting complicated when you have transformed values because there is no out of the box support. Also, large datasets are problematic, and I can’t see a solution where you export gigabytes of e-mail and note attachments in a CSV file. There is no decent possibility to to error handling and logging. And the approach is not reproducible or debuggable. Overall, the option to only use The Import and Export feature fails in many points and is not a good fit for the “greenfield” approach.
The former “Dynamics SDK”- now called “Developer Tools
” – provides and application called “DataMigrationUtility.exe”. You can setup and store a configuration
where you define what entities and fields you want to migrate and use this to transport data between environments. It’s a nice tool if you want to transport configuration data between “staging” environments, like configuration that is developed in an DEV environment and transported to a user acceptance (UAT) environment. Therefore, you can use your predefined configuration in a deployment pipeline. But it’s fails to handle all the difficulties that we found above. Without even going thru all the point in detail, the “Configuration Migration tool” can’t handle different source and destination schema. And that’s and hard requirement for the “greenfield” approach.
A common tooling that we can see in the field is to use SSIS together with Kingsway Toolkit
to build up data integrations or perform a data migration. With SSIS in combination with the Kingsway Toolkit and at some points maybe a little bit of custom code, we can conquer all difficulties listed above. So, it’s a valid option to make a migration with the “greenfield” approach. Sidenote: Nowadays a notable alternative to SSIS, is Azure Data Factory in combination with the Dataverse and Dynamics connector.
#4 Console Application
Finally, you can build a (C#) console application that calls the APIs of the source system to extract the data, write custom code to transform the data and call the APIs of the destination system to load the data. This approach is the most flexible but also most time intensive approach. We can conquer all difficulties listed above and additionally, it’s debuggable at every execution step.
What to choose?
As described above, there are only two ways to go. Either you choose to use an ETL Tool or build a Console Application. My recommendation is that you choose depending on the skillset of the team that will perform the migration. At our company, mostly everyone knows how to write C# code and only a fraction has deep knowledge in developing ETL solutions. So, the decision was easy to build a console application. To start quickly, we also develop a framework with code that we can reuse for every new migration project. In the next Blog post, I’ll take a closer look at the Framework we build internally.